The Short Life of a Poorly Built Chimney
By Jeff Mohler, Master Mason | Updated August 2026
Owner, JB Mohler Masonry — 30+ years hands-on chimney repair across Central Massachusetts
A chimney built with the wrong materials or methods fails fast. I've torn down chimneys that were only 10 to 15 years old because the original builder skipped fundamentals that any experienced mason should know. In Massachusetts, where freeze-thaw cycles hit hard from November through April, those shortcuts don't just age the chimney — they destroy it.
This isn't theory. The case study below is from a real job we completed in Central MA. The chimney was 15 years old. It needed a partial rebuild. Here's what went wrong, what Massachusetts code actually requires, and how to spot these problems before they become a five-figure repair.
Anatomy of a Failed Chimney: The "Temporary" Repair That Made It Worse
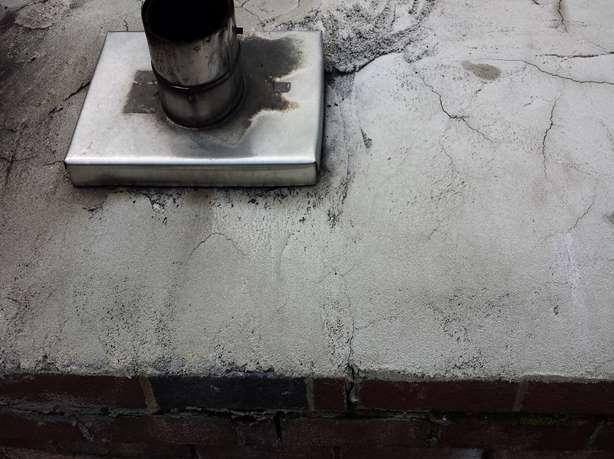
The homeowner called us after noticing moss growing on the brick face and white streaks running down the masonry. A previous contractor had "fixed" the chimney by skimming a thin layer of mortar over the concrete crown.
That skim coat lasted two winters.
What actually happened
Once the crown was compromised, water entered the chimney structure through hairline cracks too small to see from the ground. Massachusetts winters did the rest: water froze inside the brick, expanded, and began destroying the masonry from the inside out. This is called freeze-thaw spalling, and it's the single most common cause of chimney failure in New England.
The moss and white chalky streaks — efflorescence — were clear signals that moisture was trapped inside the brickwork. By the time we arrived, a massive vertical crack had formed on the chimney face, indicating severe internal structural damage.
What to look for on your own chimney: Loose or missing bricks, gaps in mortar joints, spalling (flaking brick faces), moss growth, white efflorescence streaks, or any visible crack that runs vertically or in a stair-step pattern.
If you see these signs, the damage is already advancing. See our guide to visually inspecting your chimney for what you can check safely from the ground.
The Smoke Chamber: Where Most Chimneys Fail
The repair for this chimney required stripping it back to the fireplace area — a partial rebuild on a chimney that should have lasted 50+ years.
When we opened it up, the root cause became obvious.
The building code violation
The original mason had built the smoke chamber — the triangular passage above the firebox that channels smoke into the flue — without proper structural support. Instead of building 6 inches of solid masonry behind the smoke chamber throat (Massachusetts building code requirement for exterior chimneys; 8 inches for interior chimneys), he relied on the thin exterior brick veneer to act as the chamber wall.
This is a fundamental error. The smoke chamber handles extreme heat expansion with every fire. Without dedicated masonry walls to isolate that heat and expansion, the stress transfers directly to the exterior brick. Over time, the brick cracks. Water enters. Freeze-thaw finishes the job.
What a proper smoke chamber looks like
A correctly built smoke chamber has:
- Structural masonry walls (minimum 6″ solid brick or block) on all sides of the chamber
- Proper parging — a smooth, sealed interior surface that improves draft and reduces creosote buildup
- Adequate clearance from combustible framing per code
- A flue liner that runs the full height of the chimney, properly sealed at the base
Learn more about our chimney repair process and how we evaluate structural damage →
Sealing the Chimney for the Long Haul
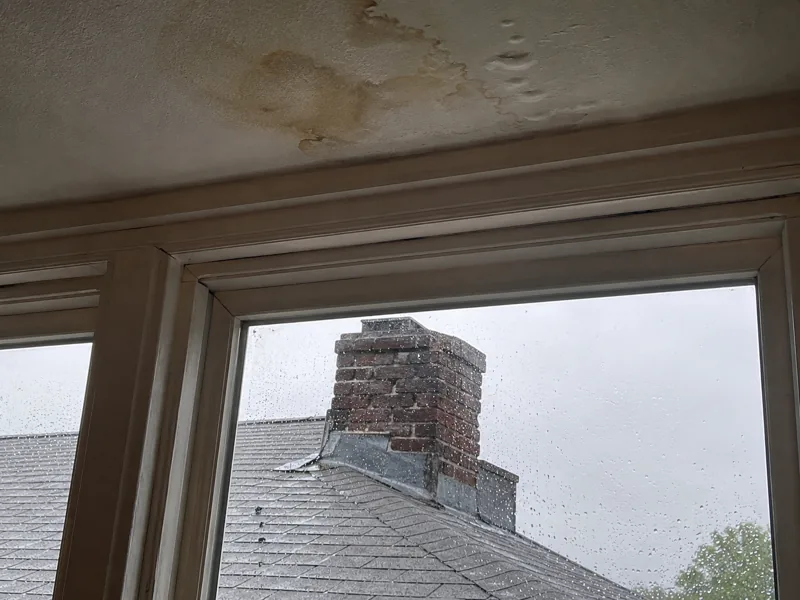
Beyond the smoke chamber failure, this chimney lacked a critical detail: a moisture barrier between the masonry and the house siding. Without that barrier, water that wicked through the brick had a direct path into the wall cavity.
What we did
- Stripped the chimney back to sound masonry above the fireplace
- Rebuilt the smoke chamber with proper structural walls and parging
- Installed a through-wall flashing and moisture barrier where the chimney meets the siding
- Poured a proper concrete crown with a 2-inch overhang, sloped to shed water past the brick face — not a skim coat, not mortar smeared on top, but a formed, reinforced cap built to last decades
The difference between a proper crown and a temporary fix is the difference between a chimney that lasts 50 years and one that needs rebuilding in 15.
See our dedicated page on chimney crown repair →
How Long Should a Chimney Actually Last?
A properly built masonry chimney should last 50 to 100 years with routine maintenance. The most common maintenance need is repointing — grinding out deteriorated mortar and replacing it with fresh mortar matched to the original in hardness and color.
When we see chimneys failing in under 20 years, the cause is almost always one of these construction errors:
| Problem | Typical Lifespan | What It Looks Like | |---|---|---| | No proper crown / skim-coat crown | 5–15 years | Cracks on top, water stains inside | | Improper smoke chamber construction | 10–20 years | Vertical cracks, heat damage to framing | | Missing moisture barrier | 10–20 years | Water damage to interior walls near chimney | | Wrong mortar type (too hard for old brick) | 10–20 years | Brick faces spalling while joints remain intact | | No flue liner | 15–25 years | Creosote buildup, cracked flue tiles, drafting issues |
Learn about repointing and when it's enough vs. when rebuilding is the better option →
Seasonal Chimney Maintenance Checklist for Massachusetts Homeowners
A small amount of attention each year prevents the major repairs:
Spring (after the last hard frost)
- [ ] Walk the perimeter and look for spalling brick, missing mortar, or new cracks
- [ ] Check the crown with binoculars for hairline cracks or deterioration
- [ ] Look for moss or efflorescence — both mean water is getting in
- [ ] Schedule a professional inspection if you burned wood all winter
Fall (before first fire)
- [ ] Verify the damper opens and closes fully
- [ ] Check for bird nests or debris at the cap
- [ ] If you haven't had an inspection in 12+ months, schedule one before heating season
Every 2–3 years
- [ ] Professional chimney inspection with camera scope of the flue and smoke chamber
- [ ] Evaluate mortar joints for repointing needs
Frequently Asked Questions
How do I know if my chimney was built correctly?
The only way to be certain is a professional inspection that includes the smoke chamber and flue liner. Visual checks from the ground can catch obvious problems, but the most dangerous defects — improper smoke chamber construction, cracked flue liners, missing clearance from combustibles — are hidden inside. If your chimney is under 20 years old and showing cracks, spalling, or leaks, it's worth having it inspected.
Can a poorly built chimney be fixed, or does it always need rebuilding?
It depends on where the failure is. A bad crown can be rebuilt without touching the rest of the chimney. Failed flashing can be replaced. But if the smoke chamber was built wrong or the structural walls are compromised, patching the surface won't solve the underlying problem. We evaluate each chimney to determine whether a targeted repair is sufficient or if rebuilding is the only safe option.
What's the difference between repointing and rebuilding?
Repointing restores mortar joints when the brick or stone is still sound. Rebuilding is required when the masonry units themselves are damaged, when structural walls are compromised, or when the chimney has shifted or leaned. Our chimney repointing page explains how we decide between the two →
Why do Massachusetts chimneys fail faster than chimneys in warmer climates?
Freeze-thaw cycles. Water enters tiny cracks in mortar or brick. When temperatures drop below 32°F, that water freezes and expands, forcing the crack wider. The next thaw allows more water in. Repeat that cycle 50+ times per winter, and the damage accelerates exponentially. This is why proper crowns, flashing, and moisture barriers are non-negotiable in New England.
How often should I have my chimney inspected?
The National Fire Protection Association (NFPA) recommends an annual inspection for chimneys in active use. Even if you only use your fireplace occasionally, an annual inspection catches crown cracks, critter intrusions, and liner damage before they become expensive problems.
Related Reading
- Visually Checking a Chimney: What Homeowners Can Spot From the Ground
- How to Stop a Leaking Chimney
- Chimney Crown Repair vs. Replacement
- Chimney Repointing: When It's Enough and When It Isn't
- Anatomy of a Chimney and Fireplace
Professional Chimney Repair in Central MA & MetroWest
JB Mohler Masonry has repaired and rebuilt chimneys across Lancaster, Clinton, Bolton, Concord, Wayland, and surrounding towns for over 30 years. Every inspection and repair is led by me, Jeff Mohler — not handed off to a subcontractor.
If your chimney is showing cracks, moss, leaks, or you're concerned about how it was originally built, call (978) 365-6800 or complete our online request form for a professional evaluation. We reply within one business day.
Jeff Mohler is a master mason and the owner of JB Mohler Masonry, serving Central Massachusetts since 1995. He holds a StoneYard® Certified Installer credential and performs or directly oversees every chimney repair and rebuild project.
Related masonry guides
For a closely related explanation, see how a Corinthian granite chimney is laid out and built as a complete masonry system.
For the next practical step, review how different chimney types change the way a Massachusetts home drafts, heats, and handles repairs.